
Imagine needing to manage dozens, or even hundreds, of different websites. Doing this individually means logging into dozens of dashboards, running separate plugin and theme updates, managing dozens of user credentials, and paying for separate hosting plans or managing isolated environments. It is an administrative nightmare.
This is where WordPress Multisite comes to the rescue. Introduced as part of WordPress 3.0, Multisite is a built-in feature that allows you to create a multisite network on a single installation of WordPress. It enables you to run multiple virtual sites from the same database and core files, sharing plugins, themes, and server resources while maintaining separate content, settings, and user permissions.
WordPress Multisite transforms a standard WordPress installation into a powerful multi-tenant platform. Instead of running isolated instances, a Multisite setup operates from a single parent directory on your server. When you activate the network, you become the “Super Admin,” granting you total control over every site created under that network. Sub-sites can be configured as subdomains (e.g., sub.example.com) or subdirectories (e.g., example.com/sub/), or even mapped to completely unique domains (e.g., independentdomain.com) using domain mapping.
To understand whether a multisite network is right for your projects, it is vital to know how WordPress structures a Multisite environment. Unlike standard single-site installations, a Multisite setup shares several core assets while maintaining logical division for others:
wp_posts, wp_options). Additional sites in the network get their own unique sets of tables with prefix numbering (e.g., wp_2_posts, wp_2_options). However, tables like wp_users and wp_usermeta are shared globally across the entire network, allowing single-sign-on functionality.wp-content/uploads/sites/ directory, keeping the files logically isolated.During the setup phase, you must choose how your network structures its URLs. This decision is permanent and requires significant technical work to change later:
site1.example.com): This model requires wildcard DNS configuration on your domain registrar. Each new site acts as a subdomain. It is ideal for independent brands, distinct regions, or user-created blogs.example.com/site1): This model uses paths. It is extremely easy to set up and requires no extra DNS configuration. This is perfect for structured corporate sites, multilingual translations, or project directories.While a multisite network is incredibly powerful, it is not a one-size-fits-all solution. Below is a comprehensive comparison of the advantages and limitations of utilizing WordPress Multisite.
| Pros (Advantages) | Cons (Limitations) |
|---|---|
| Centralized Management: Update WordPress core, themes, and plugins for the entire network with a single click. | Single Point of Failure: If your server goes down, or if a database error occurs, every single site in your network goes offline simultaneously. |
| Resource Efficiency: Consumes far less server disk space and memory compared to hosting dozens of independent WordPress installations. | Plugin & Theme Constraints: Individual site admins cannot install custom plugins or themes. They must request access from the Super Admin. |
| Shared User Base: Users can easily log in to multiple sites in the network with the same credentials, making user management effortless. | Shared Resources & Performance: A sudden traffic spike on one site can consume server resources and slow down or crash all other sites in the network. |
| Global Branding: Easily share matching themes and parent/child configurations to keep brand standards consistent across all properties. | Complex Database Backups: Extracting or migrating a single site out of a multisite network into a standalone site is a highly complex process. |
WordPress Multisite is highly specific in its utility. It works best when the websites in the network share common features, goals, or administration structures. Here are some of the most common real-world use cases:
Universities and school districts frequently use Multisite. The main site (e.g., university.edu) represents the school, while individual departments, clubs, and student organizations have their own subdirectories or subdomains (e.g., biology.university.edu or university.edu/student-union). This allows student leaders to manage their site’s content without risking the security or breaking the layout of the primary university website.
For global brands operating in multiple languages or countries, a multisite network is highly effective. You can deploy localized sites such as es.brand.com, fr.brand.com, and de.brand.com under a single administration. Because they share the same base themes and functional plugins, developers can implement universal features while local marketing teams focus exclusively on translating and tailoring local content.
Real estate agencies, retail chains, and franchise restaurants benefit greatly from Multisite. For example, a national gym franchise might want a site for every physical location. A Super Admin designs a standard site template with a locator tool, localized contact forms, and class schedules. Franchise managers can then update their specific location’s hours and events without altering the corporate brand rules or core design elements.
If you want to run a platform where users can sign up and automatically build their own blogs or landing pages, Multisite is the foundation. Platforms like WordPress.com use custom versions of this exact structure. By pairing WordPress Multisite with domain mapping, you can create a business model where users pay you to access pre-designed templates and custom domains.
Setting up WordPress Multisite requires editing some core system files. Before beginning, take a complete backup of your WordPress database and website files. It is also recommended to perform this setup on a development staging server first.
To start, you need to enable the hidden Multisite setup screen in your WordPress dashboard. Connect to your server using an FTP client or your hosting provider’s file manager, locate the wp-config.php file in your root folder, and open it in a text editor.
Add the following line of code directly above the line that says /* That's all, stop editing! Happy publishing. */:
define( 'WP_ALLOW_MULTISITE', true );Save and upload the updated file back to your server.
Log into your WordPress dashboard and navigate to Plugins > Installed Plugins. Select all plugins, choose Deactivate from the bulk actions dropdown, and click Apply. Do not worry; you can reactivate them as soon as the installation is complete.
With plugins deactivated, navigate to Tools > Network Setup in your sidebar menu. Here, you will configure your network settings:
Click the Install button to initiate the network generation process.
After clicking Install, WordPress will display two blocks of code. You must insert these into your server files to complete the network binding:
Open your wp-config.php file again and paste the provided code block right above the /* That's all, stop editing! Happy publishing. */ line. It will look similar to this:
define( 'MULTISITE', true );
define( 'SUBDOMAIN_INSTALL', false );
define( 'DOMAIN_CURRENT_SITE', 'yourdomain.com' );
define( 'PATH_CURRENT_SITE', '/' );
define( 'SITE_ID_CURRENT_SITE', 1 );
define( 'BLOG_ID_CURRENT_SITE', 1 );Open your .htaccess file (typically found in the same root folder as wp-config.php) and replace all existing WordPress rules with the code block provided on your dashboard. It generally resembles this structure:
RewriteEngine On
RewriteBase /
RewriteRule ^index\.php$ - [L]

# add a trailing slash to /wp-admin
RewriteRule ^([_0-9a-zA-Z-]+/)?wp-admin$ $1wp-admin/ [R=301,L]

RewriteCond %{REQUEST_FILENAME} -f [OR]
RewriteCond %{REQUEST_FILENAME} -d
RewriteRule ^ - [L]
RewriteRule ^([_0-9a-zA-Z-]+/)?(wp-(content|admin|includes).*) $2 [L]
RewriteRule ^([_0-9a-zA-Z-]+/)?(.*\.php)$ $2 [L]
RewriteRule . index.php [L]
Note: If you are using Nginx, you will need to add specific server blocks to your Nginx configuration files instead of using .htaccess.
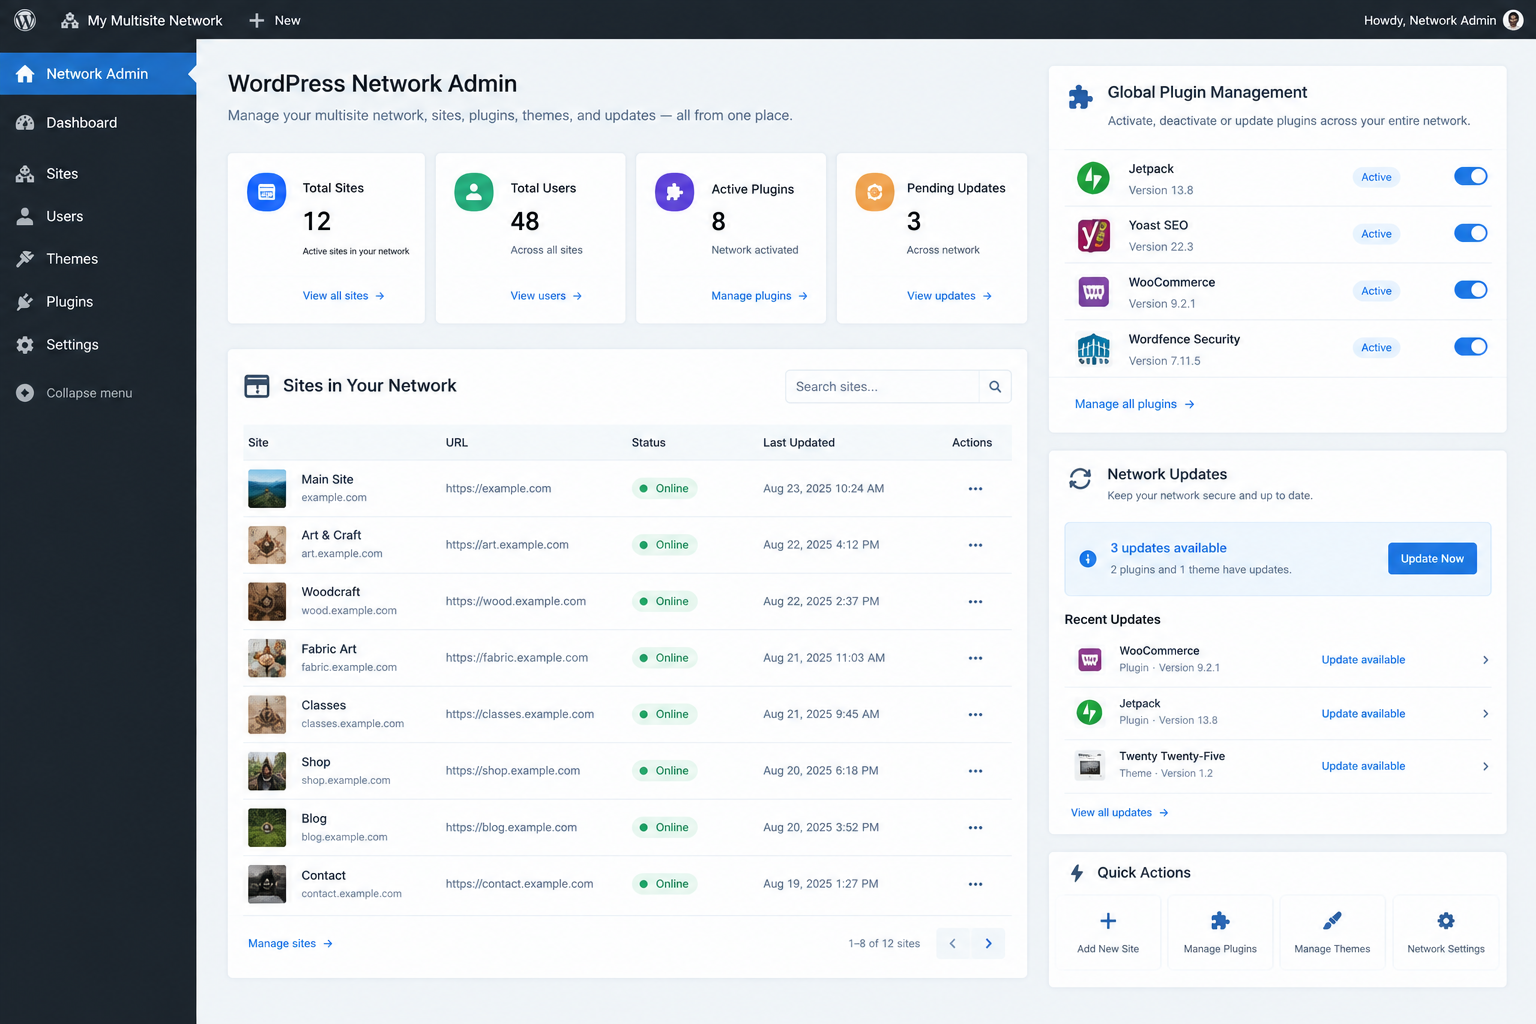
Once both files are saved and uploaded, log out of your WordPress dashboard and log back in. You are now the Super Admin! In the top-left corner of your administration bar, you will see a new menu item called My Sites > Network Admin. This is your command center for managing sites, users, themes, and plugins across the entire network.
Once your network is active, maintaining performance, safety, and organization becomes your top priority. Keep these expert strategies in mind:
WordPress Multisite is an incredibly robust tool that offers unmatched efficiency for managing multiple web properties under a single roof. It is the perfect fit for schools, multi-regional businesses, and complex brand portfolios that thrive on standardized infrastructure. However, if your sites require highly customized plugin selections, completely different server environments, or independent database control, keeping them as separate, distinct WordPress installations is the smarter, more stable route.